My Binaural Head
In this post I talk about binaural recording and making my own binaural head, as well as sharing some recordings taken using the head.
Here’s recording from my local park. It’s a Sunday in May, very early in the morning - that magical time between night and day when one sound world transitions to another. Rooks and jackdaws are busy getting ready to leave their roosts, and a tawny owl makes an appearance too.

The recording location
So, what is binaural recording exactly?
Binaural recording is a type of stereo recording. To make any type of stereo recording you need two microphones, one to capture sounds from the left-hand perspective, the other to capture sounds from the right-hand perspective. A variety of different stereo configurations exist, including binaural. If you are interested in stereo recording more generally and how it works, click here for a bit more information (a kind of appendix to this blog post). This article by the microphone company DPA is a useful guide to the most common stereo mic configurations and how to set them up.
With a binaural set-up what you are specifically trying to do is to mimic the listening conditions of the human head and make a stereo recording that corresponds to how someone’s ears would hear the sounds around them. The microphones are placed in the same position as the ears – the width of a head apart, and a block of material in between the microphones acts as a head. Like a real head, the dummy head’s left microphone (acting as the left ear) will capture sounds from the left slightly earlier, and at a higher volume than the right microphone, and vice versa. The dummy head and ears will also absorb and reflect sound, meaning that as well as receiving sounds at marginally different times and volumes, the left and right microphones will also receive slightly different versions of a given sound in terms of its frequency content. This all combines on playback to create a ‘stereo image’ and the idea is that because you have mimicked the same conditions under which a human receives sounds, when you listen back it will sound particularly real, or life like, and more immersive than stereo recordings made using other methods.
Everybody’s head and earlobes are a slightly different shape, meaning incoming sounds are modified in slightly different, individual ways before reaching the ear canals. Acoustic engineers working with binaural sound use something called the Head Related Transfer Function or HRTF (a complicated mathematical formula…) to take account of how our bodies interact with external sound sources to subtly influence what we actually hear. Everyone has their own HRTF based on their own physical features, so a recording made using a home-made binaural head or even a professional product will only approximate what your own ears would have picked up. In developing and designing their professional KU 100 binaural head (retailing at £6,600) Neumann took hundreds of measurements of people’s heads to find average dimensions that would give good results on listening back. Still, I have spoken to some people who don’t like binaural sound - perhaps this is because their own dimensions are too different / incompatible with those of the dummy heads the sounds were recorded on?
Binaural recording using your own head
If you want to make a binaural recording without having to use a dummy head you can use your own head instead! Get two small omni-directional lapel mics and position one in each ear, maybe secured with a headband or equivalent. Unlike cardioid, super-cardioid, hyper-cardioid or figure-of-eight mics which are all ‘directional’, omni-directional mics record everything around them equally and work well for the binaural set up. A stereo pair of omnis is best as they should arrive with you having been matched in terms of frequency response.
I’ve made binaural recordings using my own head, but the disadvantage as a solo recordist is that you can’t monitor what you’re recording. You don’t know in real time whether you are making a good recording or not, since it’s not possible to put headphones on over your microphoned ears. You will however have made a recording that corresponds perfectly to your own head, and your own HRTF!
As with any dummy head recording, make sure your recording device is recording in stereo mode so the left mic is going to the left channel and the right mic to the right channel. Or you could also record in multi-track mode, so you have each mic’s recording on a separate track, which you can then pan hard left and hard right in audio editing software. What you don’t want is everything summed to mono – so the left and right tracks both get recorded onto the same track.
It’s also important for listeners to play back binaural recordings on headphones, not room speakers. The left ear must only hear what the left ear-mic recorded, and the right ear must only hear only what the right ear-mic recorded. If you listen back on room speakers the effect will be lost as both ears will hear what both mics recorded. On top of this, the room will also add its own reflections, boosting some frequencies and attenuating others. The stereo image and colouration provided by your HRTF will be disrupted.
How I made my binaural head
My binaural head is quite heavy and therefore not particularly portable! I had some spare wood lying around, and that’s partly why I decided to go for a wooden head. The other reason though was that I figured maybe I should try and get as close to the density of a real human head, and wood seemed to be a better bet in this regard than polystyrene, although there is no science behind my choice – it’s just an assumption. Many people use polystyrene heads with good results.
The first step was to measure the length and width of my head and make a dummy version of approximately the same size. I just used a jigsaw, a work bench, and some wood glue. The result was something that looked a little like a cyberman from Dr Who.

The basic head
I bought the following bits of kit from Fel Communications:
one stereo pair of EM272 omni directional mics with a mini stereo / trs connector
two foam covers for the microphone capsules
one pair of silicon ears
some Rycote furry fabric for wind protection.
To seat the ears in the head I ended up chiselling out two oval holes about 1.5cm deep. Each ear fits tightly into one of these and has not needed any additional fixings. I also chiselled out a small channel on each side for the mic wire to sit in.
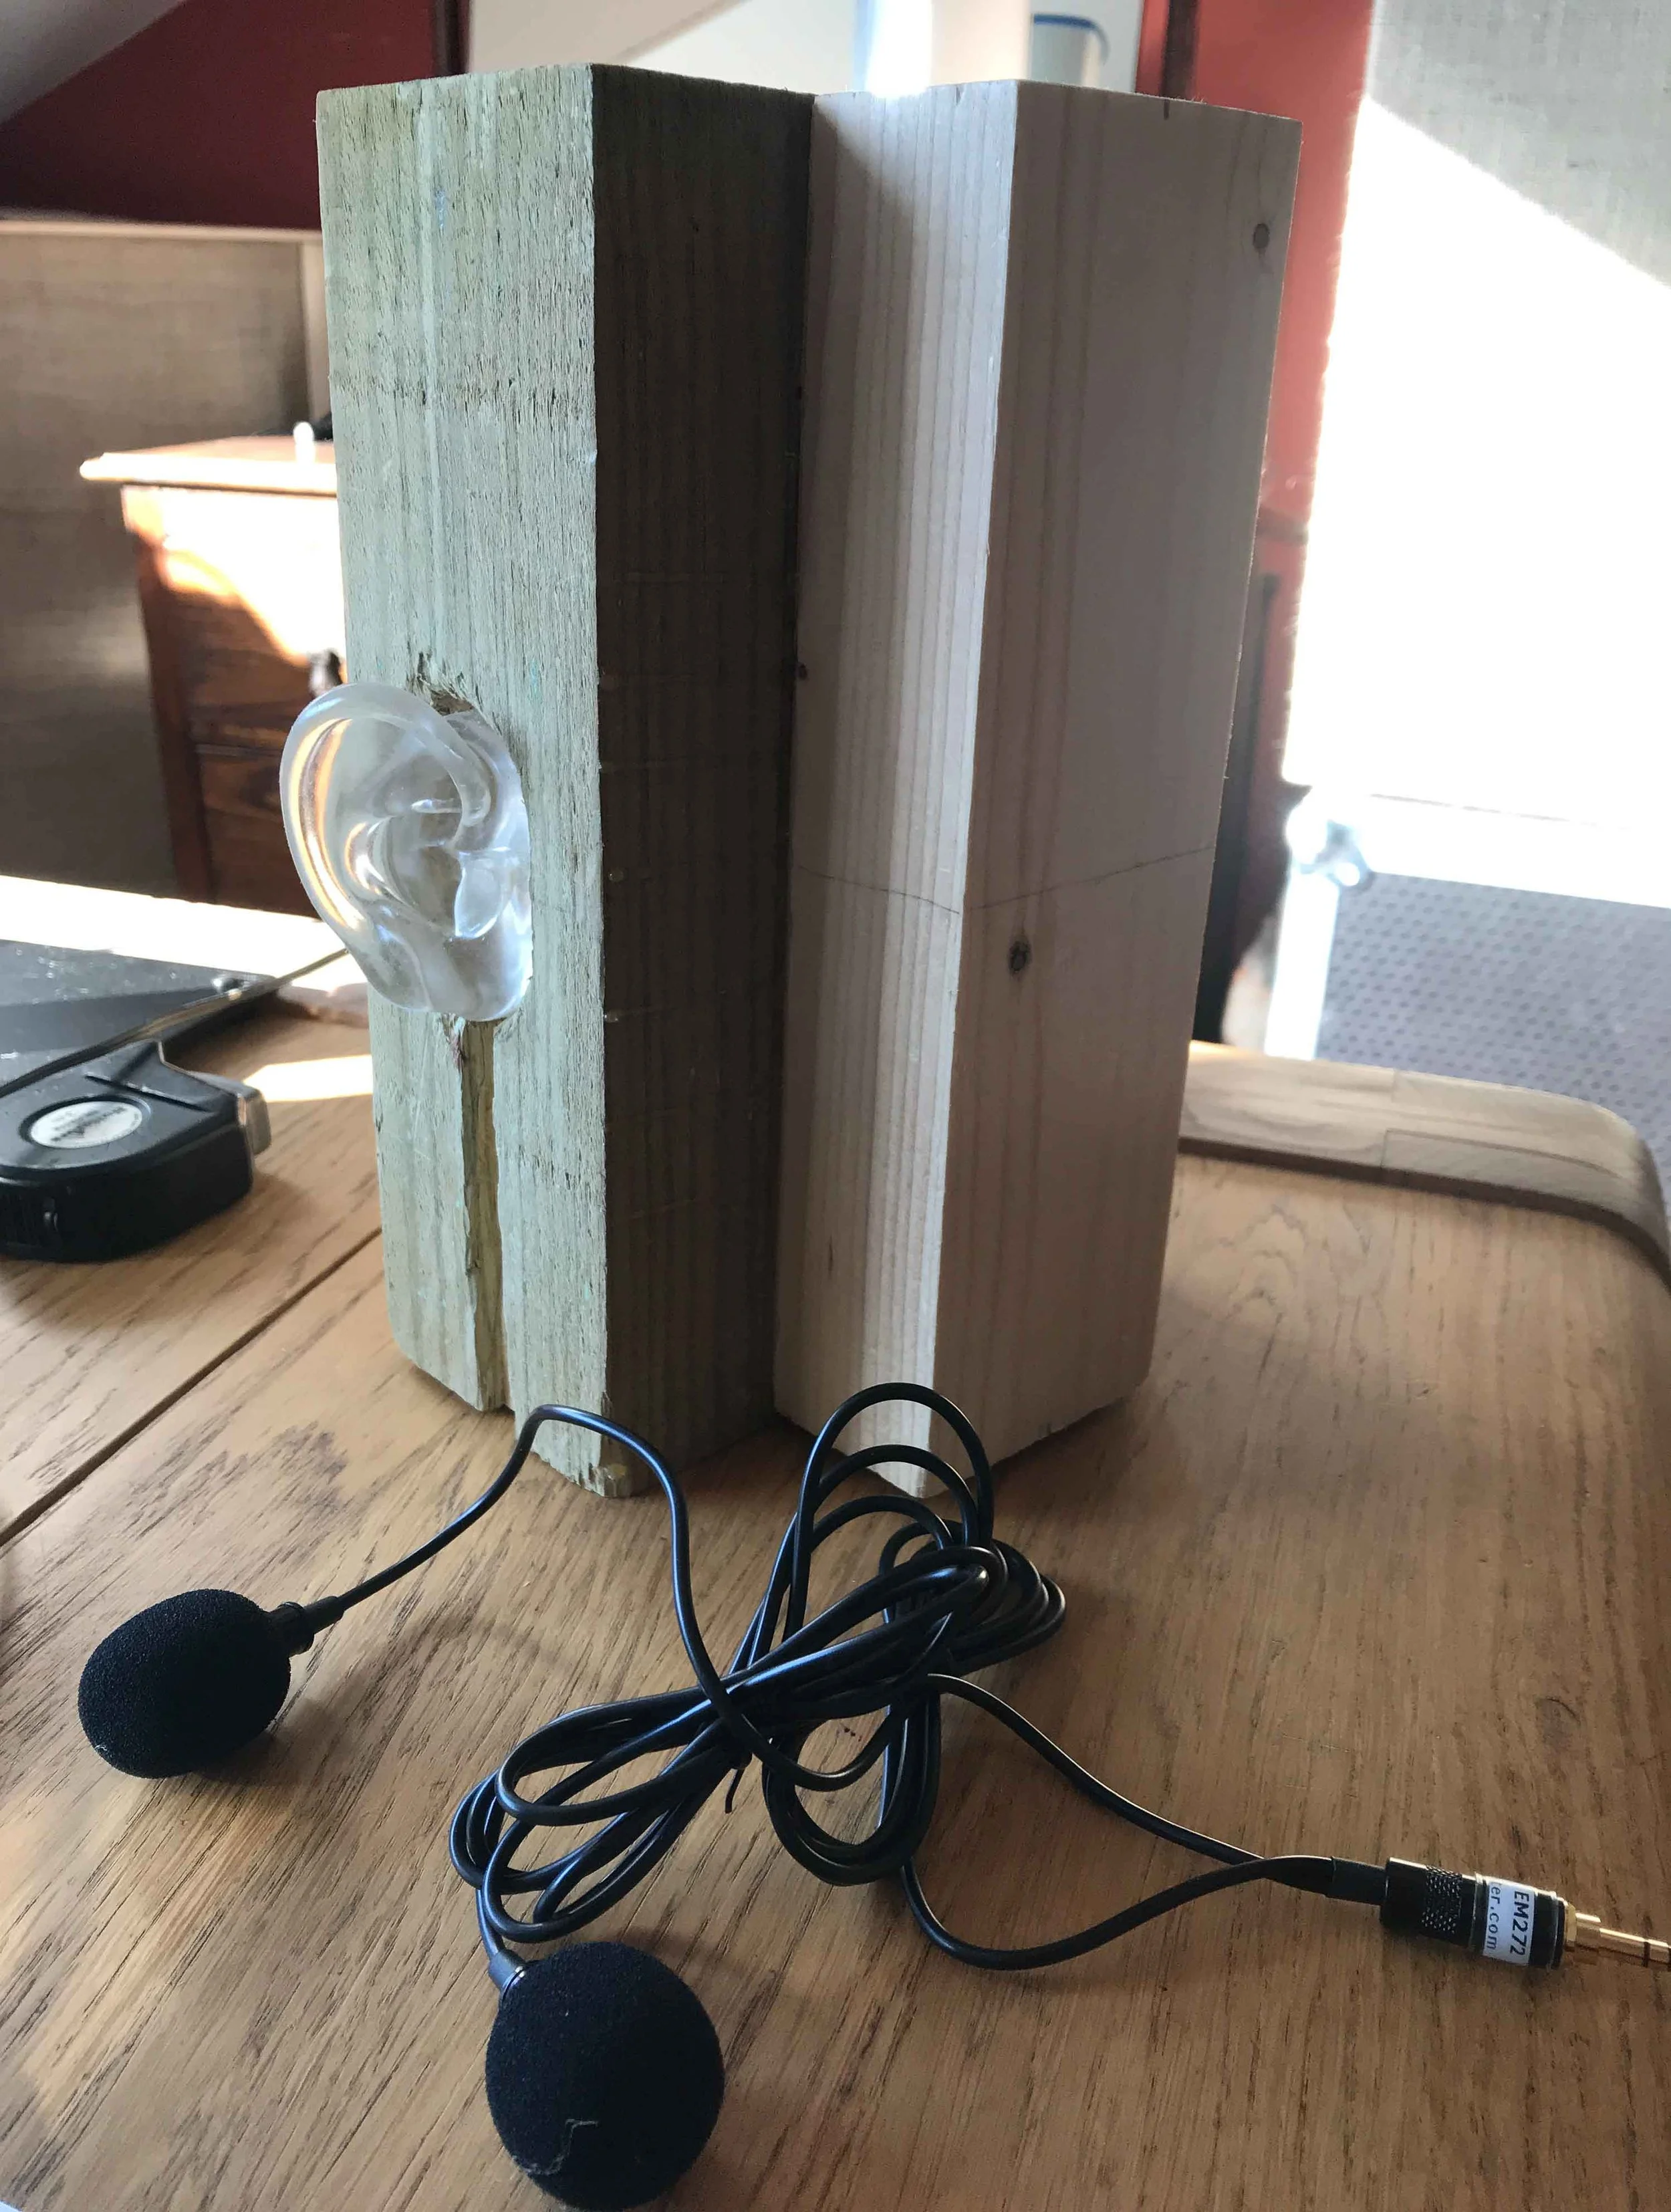
Binaural head with silicon ears in place. EM 272 stereo pair with foam covers in foreground, waiting to be fitted.
To position the microphones in the silicon ears I had to pierce a hole in the back of each ear and poke the mic capsules through. I was a bit worried the silicon might split very easily once pierced, but it held up ok.
I plan to spend quite a lot of time outside with my binaural head so the next step was to provide some wind protection. The mics each have a foam cover on them but in anything more than a light breeze these won’t be sufficient to stop wind interference adversely affecting or ruining a recording (this wildmountainechos.com blog discusses DIY wind protection in more detail). Furry fabric is good at dissipating the wind before it can reach the mic capsules, but it’s also important to build a non-turbulent air space into your design - a gap between the furry fabric wind protection and the microphone capsules. My solution here was pretty crude but has worked so far. I used two globe shaped metal cage feeders I got from a pet shop and clipped a circumference of wire from each using a pair of sharp pliers. I then pushed the remaining portion of the feeders onto the edge of the wood side bars, relying just on the tensile strength of the metal to keep them in place.
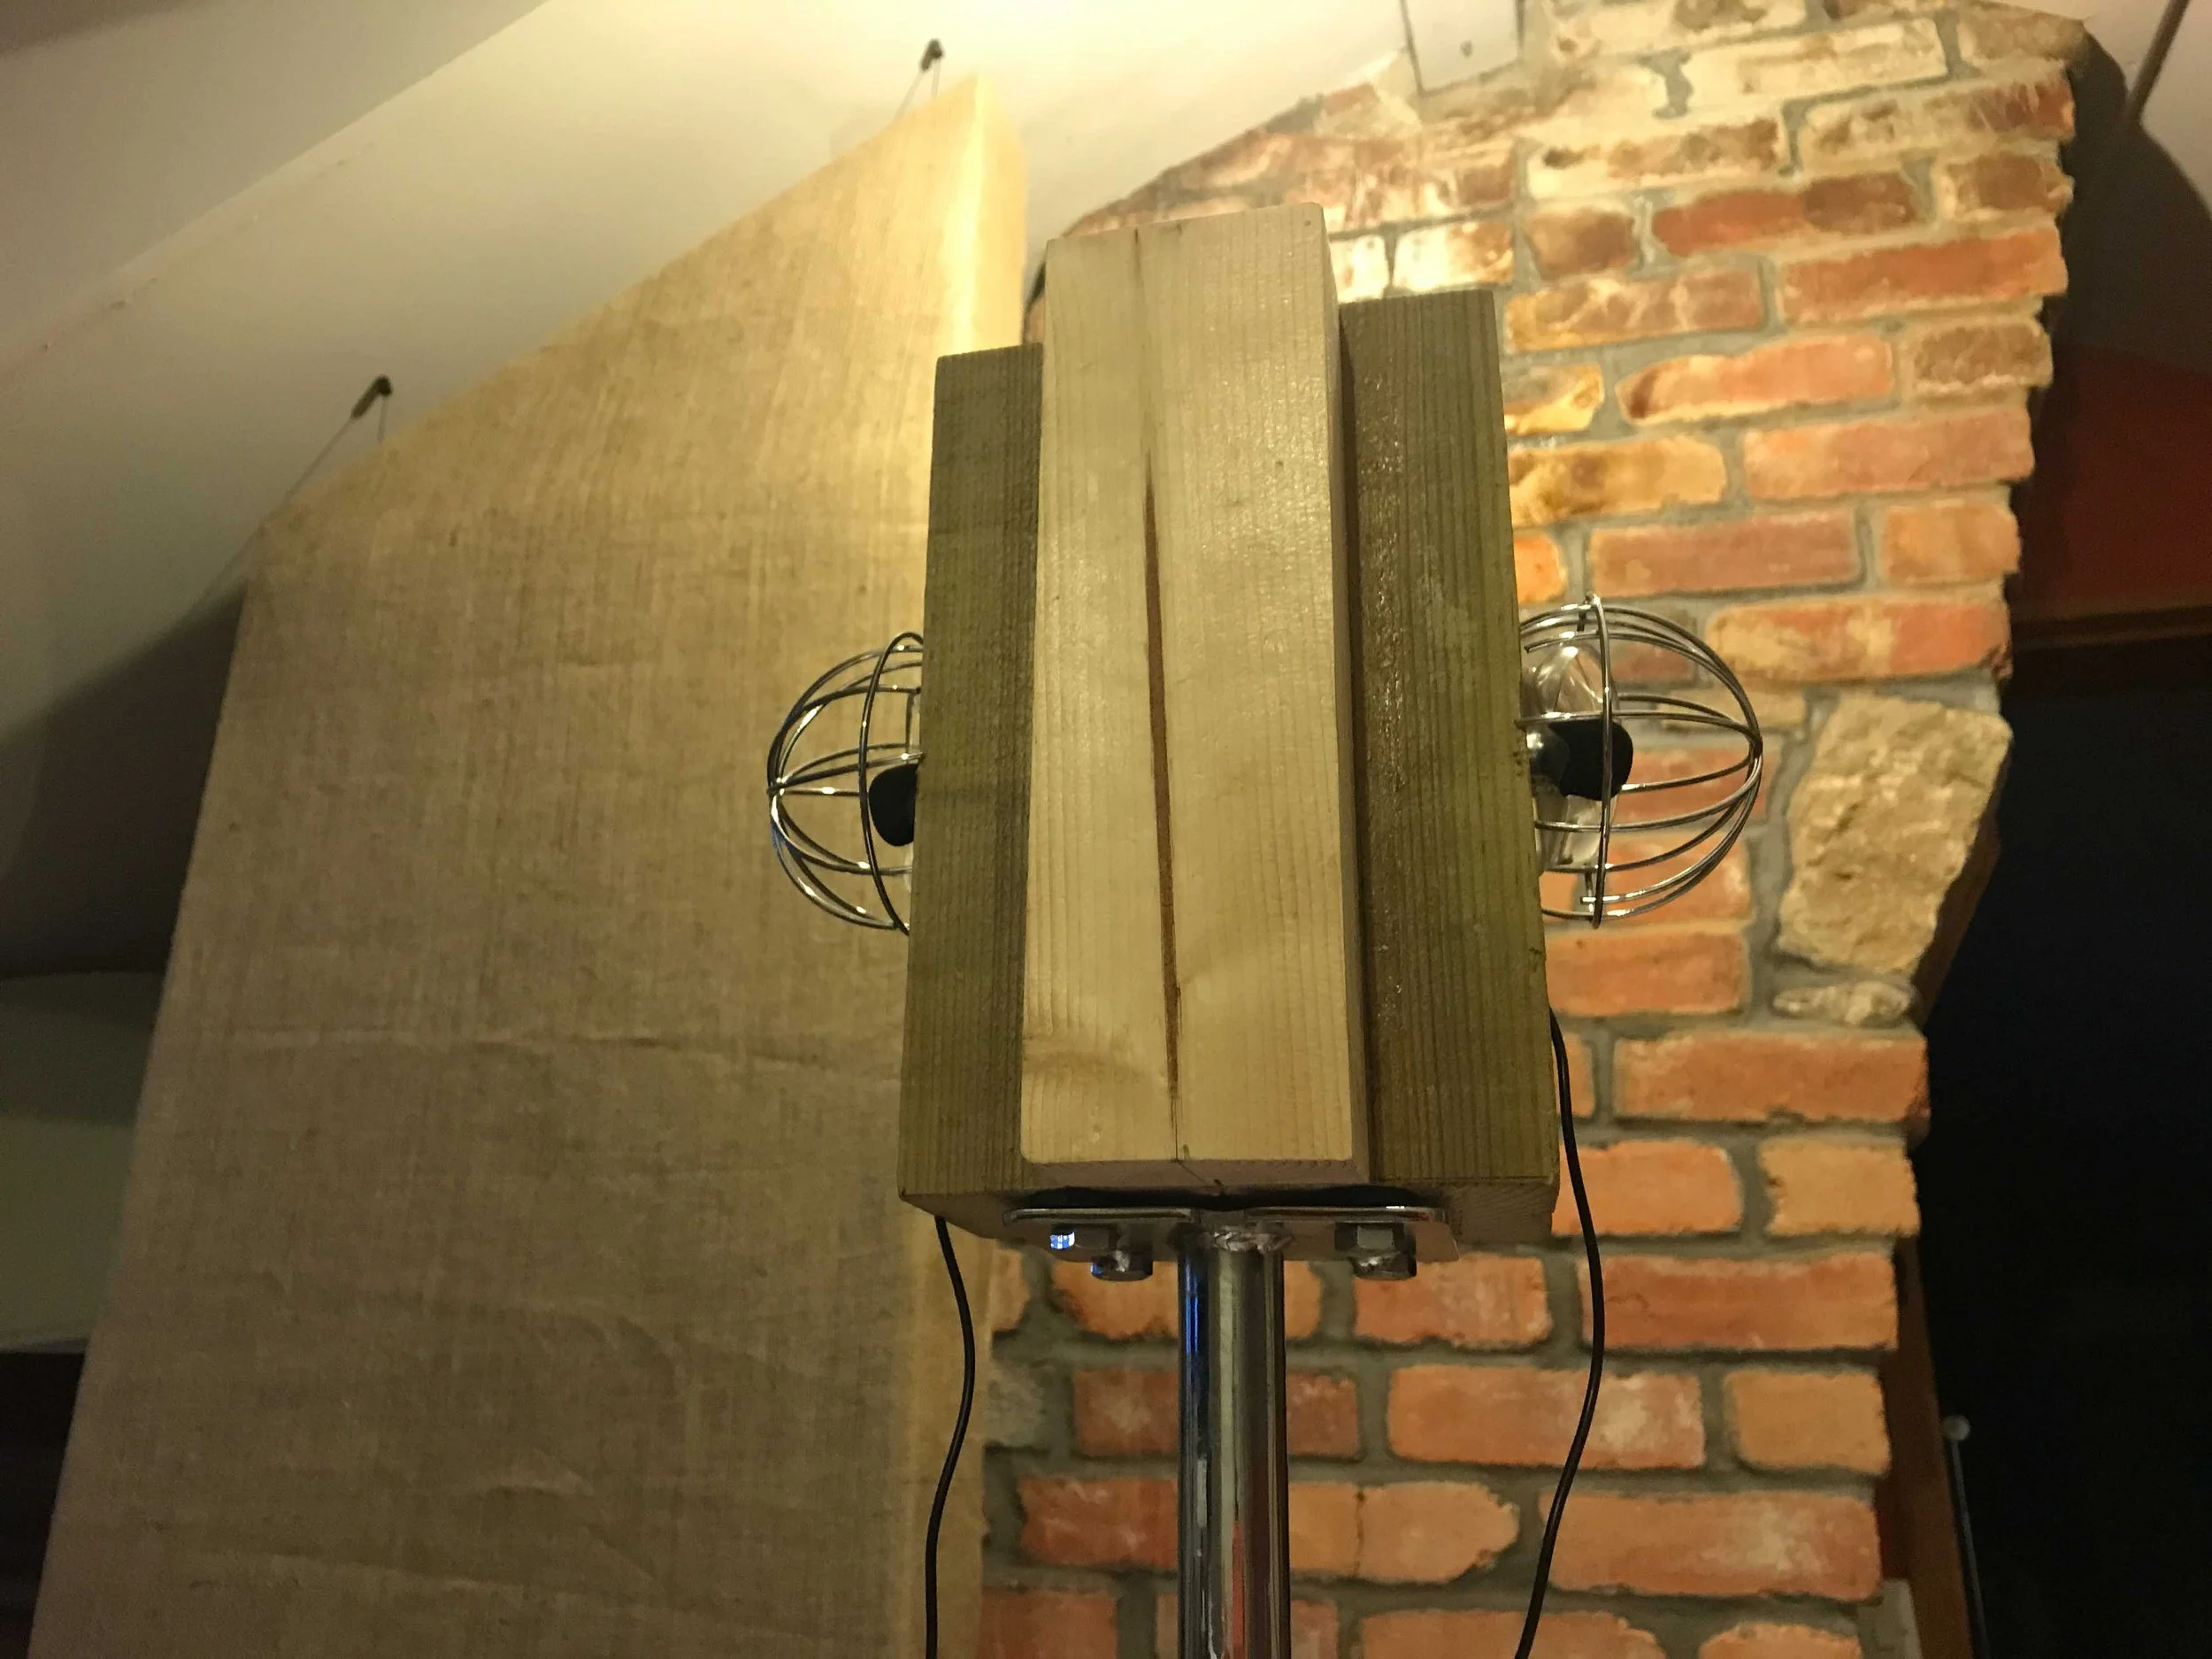
Head with mics installed in the silicon ears, and metal frames in place. The head is sitting on a re-purposed stand from a percussion kit. This makes it very stable in the field, but also very heavy to transport….
These frames provide a structure on which the furry fabric can be secured and allow for the all important air gap between the fabric and the mics. I simply cut out a circle of furry fabric for each ear and inserted some elastic around the edge and pulled it tight on to the frames.

Head with furry covers, ready for action
So that’s it. I’m pleased with the recordings the head is making. The microphones have low noise levels, and to my ears, quite a bright, clean sound. Here’s another recording from the park, this time the dawn chorus is in full swing. The location was more central than the previous one up the slope in the woods, and you can hear the drone of the sports centre ventilation unit. Foregrounded against the general cacophony of bird song there’s the rapid, flutey warble of a black-cap, followed by the two tone call of a great tit. The rooks are present too, occasionally even singing notes.
Binaural heads are also good for close up recordings, and often used by those making AMSR (autonomous sensory meridian response) audio pieces, where there is focus on intimate sounds. Here’s a recording of me walking around the head and describing whether I’m at the front, right, back or left. It’s got a toy xylophone accompaniment, also based on a recording made with the head. It’s easy to tell left placement of my voice compared with right, but much harder when it comes to differentiating whether I’m in front of or behind the head.